|
Window 10 is known for its fast processing and superb quality. And it is one of the best products of Microsoft which has so many features. But sometimes issues arises, then the customers can contact to the customer care of Microsoft through office.com/setup.  Way To Repair And Restore Window 10:
You can repair Windows 10 through advanced startup option. You should press F11 just before we power on the laptop. You can boot the installed disk and then click on Next option and then repair. Here, you should select the Troubleshoot button, when the Computer gets booted. Now, you should select the Advanced Options when you have click on Startup Repair. Remember, it will take some time to identify the problem and then fix it. If in case, the issue do not resolve then this means there is no issue with a startup. After this, you should hold the shift key from your keyboard just to restart the Window and this will return to troubleshoot. Now, you should select the System Restore and then your computer will be automatically rebooted. Then, you have to select your username and then enter password. If the issue is still there, then move to the next step.
There is problem in your computer may be facing because of the corrupt file. At this point, you should perform a file scan just by booting the operating system through safe mode. As the scan may fix the corrupted file. In case, the scan does not show any solution then you should reset your Windows 10 and again install it in your device. After this, you should restart Windows and just go to troubleshoot option. You have to press F11 again and then you should select the Reset option. Here, you will get 3 options: www office com setup Keep my files Delete Everything Restore Factory Settings
For this, you should install the Media creation Tool on your PC just by downloading it. After this, you should Download Windows 10 just by pressing the next button on the Media creation tool. Here, this will check your download. Now, the media creation tool will show you the important files. At this point, the Windows 10 has started loading. Then, the Windows 10 will analyze on your computer system. Here, you have to accept the term of the license and then you can start the installation of Windows 10. Now, the installer will check the updates which requires before installation. When the updates completed, you should press the Install button just to install the Windows 10. The above method will help you to repair and restore Window 10. If you are still facing any kind of issues, then you can contact to the expert of Microsoft Team through www.office.com/setup. The experts of Microsoft are experienced and can solve your problem easily. And they are available all the time for the support of the user. visit this link: How You Can Insert PDF Files into PowerPoint Presentation?
0 Comments
Microsoft Excel is a widely used application of Microsoft Office, This application helps the user in storing, analyzing, and calculating data. It has many functions which helps the user to maintain and show data in a presentable way. Matrix is the amazing function of MS Excel, which is a collection of numbers which are arranged into number of columns and rows. which you can install through office.com/setup. 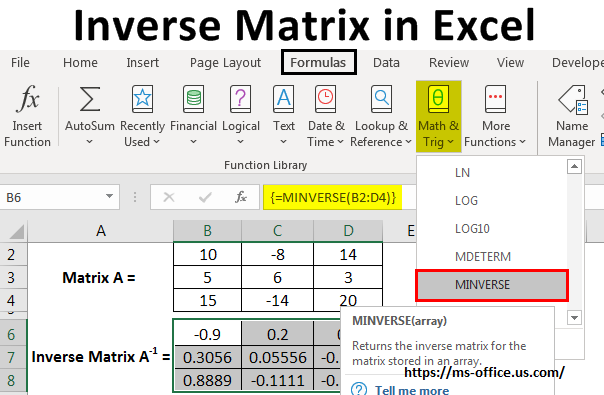 Types of Matrix Functions:
This function returns the inverse of the matrix of a given array formula. This array function is entered by pressing Ctrl + Shift + Enter. Remember, some Square matrices have inverses. So, you have to check the correct inverses by multiplying two matrices together. If a matrix has no inverse which has a determinant of zero in it and then it is called as singular. And if there is a square matrix with inverse then it is known as “nonsingular” or “invertible”. And also if there is a square matrix with no inverse then it known as “singular” or “noninvertible”.
The function is returns the product of the two matrices. If you multiply two matrices together then there should be common dimension in them. Remember, the number of columns should be equal to the number of rows. You should enter this function just by pressing Ctrl + Shift + Enter.
In this function, the new matrix is formed by interchanging columns and rows of the original matrix. Basically, Transposing of an array means that if you convert columns into rows and rows into columns. This array function is entered as Ctrl + Shift + Enter.
This function means returns the matrix determinant as an array formula. It gives you the accuracy of only 16 digits. this blog Create a Matrix in Excel: For 2016 and newer version: You have to click on Insert tab and then just select Illustrations group. After this, you have to click on SmartArt. In the SmartArt Graphic gallery, you should click on Matrix, and then just click on a matrix layout and just click on OK button. If you want to enter a text in the matrix, then you should click on [Text] in Text pane and then type the text. You can also copy the text from another program, then click on [Text] in Text pane and then paste the text. You just have to click on a box in SmartArt graphic and then just type the text. www.office.com/setup Move a Box in a Matrix: You should click on the box which you want to move and then drag it to the new location. Or you can also hold the CTRL key and then press the arrow keys on the keyboard. Choose a Different Matrix Layout: You should right-click on the matrix so that you can change the layout, and then click on the Change Layout. After this, click on the Matrix and then choose: Basic Matrix, Titled Matrix and Grid Matrix. If you wanted to know more about Excel Matrix Function, then you can visit to the site of MS Office via www.office.com/setup. more info this link: How To Troubleshoot “Excel Not Responding” Issue? In this blog, you will learn how you can enable the Phishing Email Protection Feature in Outlook. This feature of Outlook, disables links which identified as phishing attempts or malicious. If the customer needs support, then they can call the expert of Microsoft through office.com/setup. 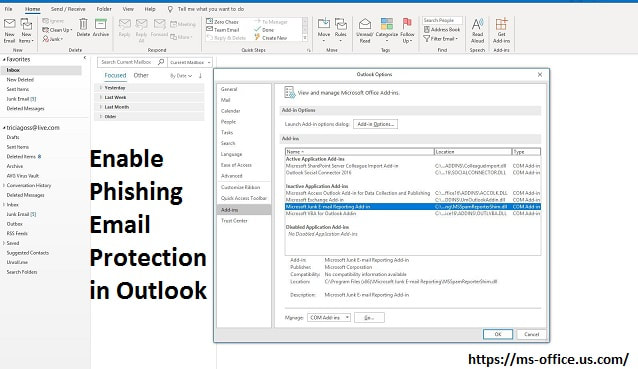 Enable Phishing Email Protection in Outlook: For this, you should go to the Home tab and, then in the Delete group you should select Junk. After this, you have to select Junk E-mail Options. Now, you have to select Low if in case,you want to filter obvious junk email messages. Then, you have to select High option just to filter out the greatest amount of junk emails. At this point, you have to select Safe Lists Only if in case, you want messages from contacts in your Safe Senders or the Safe Recipients lists to visit to the Inbox. And the other messages will be filtered to the Junk Email folder. Then, you have to select Permanently delete suspected junk email instead of moving it to the Junk Email folder if in case, you want suspected junk mail just to bypass the Junk Email folder and it should be permanently deleted. Now, you have to select Warn me about suspicious domain names in email addresses just for the extra protection against phishing messages. After this, you have to select OK button when you complete the process. You can also Keep the Outlook spam filter up to date just by using Microsoft or Office Update. Report Phishing Messages:
In fact, you can also report about the suspicious messages to Microsoft so that they help to improve spam filters. For this, you have to select the suspicious message. After this, you should go to the Home tab and then just select Junk. Now, you have to select Report as Phishing if in case, you suspect the message is a phishing email or you can select Report as Junk if you are thinking the email is regular spam. www.office.com/setup If Report Phishing Is Missing? If in case, the Report Junk or Report Phishing option is missing then from the Junk menu, you should enable the add-in. For this, you should go to the File tab. And then you have to select Options. Then in the Outlook Options dialog box, you should select the Add-ins tab. Now, in the Inactive Applications list, you should select Microsoft Junk Email Reporting Add-in. Here, you have to select the Manage dropdown arrow, and then choose Com Add-ins, and then select Go option. After this, you should select the Microsoft Junk Email Reporting Add-in checkbox. At last, you should select OK option just to enable the add-in and then restore the Report Junk options. Now, you should Restart Outlook if prompted. If you need more advice or support, then you can contact to the expert of Microsoft through www.office.com/setup. read here this link: What are the Advantages and Procedure to Update Window 10 Offline? Many users faces issues, while updating or replacing their operating system with new version. If the customer needs help, then they can contact to the Microsoft team via office.com/setup. 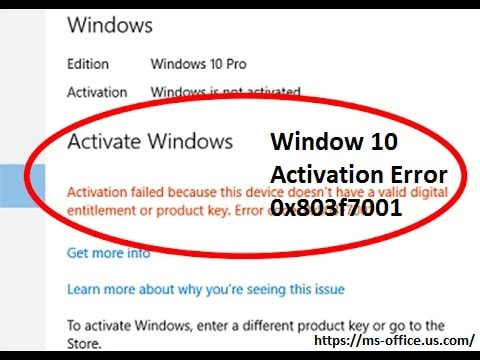 Resolution to Solve Window 10 Activation Error 0x803f7001:
To fix this issue, you have to wait for some days. Many users have reported that this issue occurs when they replace the hardware of their devices like motherboard. They try hard to remove this error but failed. After some days, this error disappears by itself. The cause of this issue is the Microsoft License is tied with both the hardware and software, so the Windows take some days to register the change in your system and then update your hardware list which connected to license. This procedure will take some days to remove the error.
The error occurs when it cannot be able to find a valid Windows license for your Computer. May be your real product key was either replaced or modified. If, you are not using the real copy of Window 10 then you cannot be able to fix this error. But if you are using a real Windows 10 operating system, then you should change your product key. For this, first you have to open the Settings app just by clicking on the Windows logo which is at the bottom left corner of the screen and then clicking on the gear item. After this, you should click on Update and Security and then go to the Activation sub menu. Here, you should click on the Change Product Key option. Now, you can use the product key of the Windows which you have used before updating to Windows 10. And you can also use original windows 10 key. Just type the code without any mistakes and it should have 25 characters. At last, just restart your computer system. www office com setup
For this, first you have to open the Run dialog box just by using the Windows key + R combination. When the Run dialog box opens, then you should type slui 4 and then click on OK button to run it. Now, you will view the screen which asks you to select your country or region. Then just give your Installation ID by reading it out loud during the call and it will give you your confirmation ID with which you can activate your copy of Windows. You should read out your confirmation ID just to double-check if you have typed it properly or not. Now, you should click on the Activate button. At last, just restart your PC. The above method will help you to solve Window 10 Activation Error 0x803f7001. If the user needs support, then they can contact to expert of Microsoft through www.office.com/setup. The Microsoft Office 365 package is a complete office suite that comes with all of the productivity application tools for everyday use, proudly developed by Microsoft itself. It has become a daily need for every second user and the reason for this is the holistic approach to work. No matter what kind of work you need to do in relation to your job, Office 365 has it all for basic and professional tasks. Use the Office 365 version because it has everything you need to do your job. www.office.com/setup You can buy it in two different ways. You can choose both online and offline. Choose a method that is more convenient for you. If you don't have a lot of times then just buy it online or you can buy it from the offline shop if you are unsure about paying online.  Features of Office 365
Office 365 is packed with the best of features that make your job very easy and fine. We've listed some of the best Office 365 features including:
Download steps for Office 365 Once you have received your Microsoft office product key office.com/setup. Download it from the official website or you can directly install it by the Microsoft office CD. Just follow these steps and download Microsoft Office 365 on your PC.
You can download and install it by following the installation steps. After the successful installation you need to activate it. Activate it by enter the key product at office.com/setup. Installation of Office 365 on Windows device: Below is detailed information on how to install Office 365 step-by-step.
Activate Office 365 on the device Activate Office 365 by following the steps below.
Only if you follow the steps will your office product be activated and ready for immediate use. For more information and questions One Drive is the amazing application of Microsoft which keeps the users data secure in cloud. You can enjoy the benefits of this application by installing Microsoft Office software through office.com/setup. 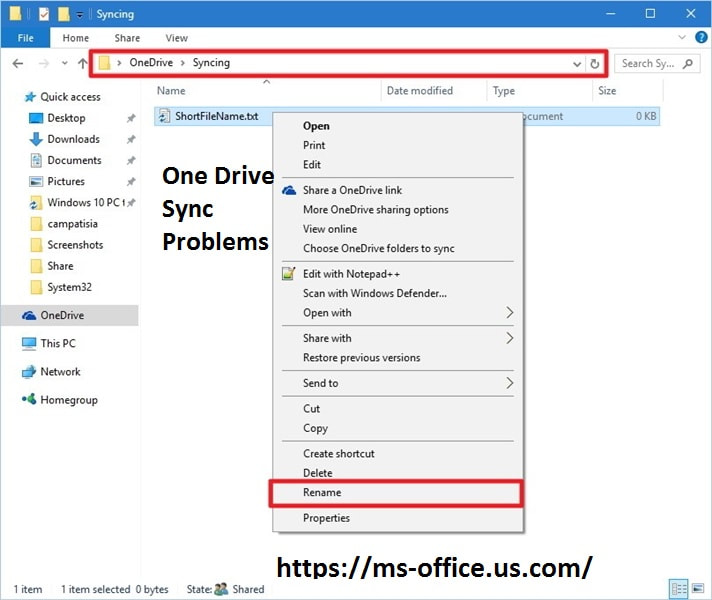 Solution To Fix One Drive Sync Issues:
First, exit the OneDrive desktop app from your computer. After this, sync it again to resolve an issue. For this, right-click the OneDrive cloud icon on your notification area. If you unable to find its shortcut, then just click on the option of “Show Hidden Icons”. Then, choose “Exit” the app and close its desktop program. After this, restart the system and this will help OneDrive establish the connection again.
If you have a premium plan on OneDrive, then also you cannot upload a single file of more than 10 GB at a time. If there is file which is exceeding this storage limit, then just try to compress that file before uploading. You can compress a file through Windows native feature or WinZip. For this, right-click on the file which you want to compress and then select the option “Add to Archive” or “Send to Compressed folder” according to the version of Windows which you are using. This will open a pop-up and you can choose the type of compression and also limit the storage of your file.
If you have OneDrive on an older version of Windows, then you might be facing this issue. Now, you can fix this issue just by going to Control Panel and then choose System & Security option. After this, you should select Windows Update and then just check for an update. At this point, you should update your operating system just by following the instructions. www.office.com/setup
Sometimes, Windows establishes the connection between the OneDrive directory and your account. To fix this issue, you should go to your Windows settings and then go to the “Accounts” section. After this, click on Email & App Accounts and then select Add an account and also add your OneDrive account manually. This will open an interface, you should provide your OneDrive (i.e. Windows/live) credentials and then sign-in to your account.
For this, you should right-click on the OneDrive icon from the notification panel and go to its Settings. Then, just visit the Account tab and after this, click on the “Choose folders” button. Here, you will get a pop-up window. You should check the folder which you want to sync with OneDrive and then click on the “OK” button. The above are some of the methods which helps to fix the One Drive Sync Issues. If the customer is still facing the One Drive Issue, then they can contact to the customer care of Microsoft Office via www.office.com/setup. visit here: How to Resolve One Note Error Code 0xe0000024? www.webroot.com/safe www.avg.com/retail Today, everyone has a Laptop and Computer with the latest version of Windows in it. But some of the people find it difficult to activate Window. But if the user cannot be able to activate Windows in their device through this following method then they can anytime contact to the customer care of Microsoft Office through www.office.com/setup. 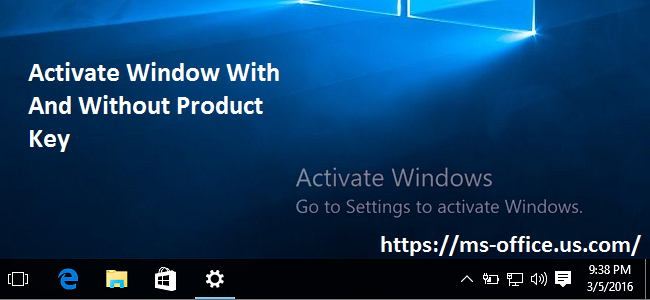 Activate Window with Product Key:
It is very simple to activate Window with Product key, for this you should have original product key. You can get it, by purchasing a copy of it or purchasing a computer which have pre-installed Window. To activate the Window, you require clicking on the start button. Then, you should select Properties just by right-clicking on your PC. At this point, you will view a Activate Window Online button. Then it will prompt you to enter your Product Key. When you enter the Product Key, you should click on the Next Step just to Activate your copy of Windows. Here, you should wait for some time so that the procedure finishes. Now, you can check your Window Activation Status. Activate Window Without a Product Key: In case, you do not have a product key, then also you can activate your window. For this, you should have Window Activator but if you do not have, then also you can start your Window. office com setup
For this, first you have to download the Window Activator and then you should Install it in your computer system through the Installer. After this, you should run the .exe file just by opening the installation directory. Now, you can see the red switch button, just click on the button. Then, just wait for the activation process to get finish.
To activate your Window without a product key, you should create a batch file and then just run it as administrator. Right now, you do not require installing any software in your Computer. You just have to copy the code of the Window into a text file. And then you have to save the text file as .bat. Now, you should right-click on the .bat file and then just run as an administrator. Here, you should wait for few minutes. After this, you should press Y key and just restart your computer. The above are some of the methods through which you can start your Windows with and Without Product key. If in case, the user is facing any kind of issues while activating the Window then they can anytime contact to the customer care executive of Microsoft through office.com/setup. The executives of the Microsoft are available all the time and are well experienced to solve your problem. visit here: How To Resolve MS Outlook Error Code 400? If the Microsoft Excel user wants to protect their MS Excel Workbook from Editing, so that nobody else can make changes in your workbook. In case, you need help then visit to the site of Microsoft Office via www.office.com/setup. 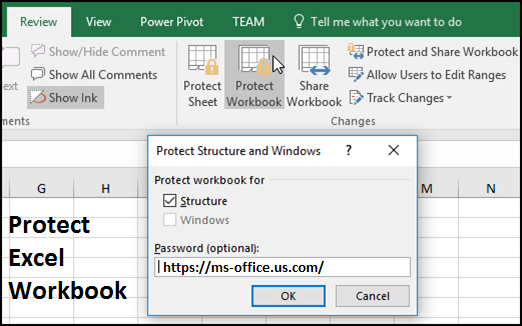 Protect Your Microsoft Excel Workbook From Editing:
For protecting Excel workbook from editing, then you have two option. One is Encrypting your Excel Workbook with the Password and other is Making your workbook read-only. Encrypt Excel Workbook With A Password: To encrypt Excel workbook with a password, you have to open your Excel file and then click on the File and then select info and choose Protect Workbook. From the drop-down options, you have to select “Encrypt with Password” option. Now, in the opened window of Encrypt Document, you should enter the password and click on OK option. For the password confirmation, you have to re- enter the password and then click on the OK button. If you want to check that your Excel workbook gets encrypted then you should close your opened workbook and again re-open it. office.com/setup Make A Workbook Read-Only: For this, open your Excel workbook which you wish to make read-only. Now, you should go to the file and select info and then click on Protect Workbook. From the drop-down options, you should select the option “always open read only”. When you apply this feature, if anyone tries to open the Excel file, then they receive the warning that the file is opened in read-only mode.
To Protect Excel Worksheet From Editing, from the Excel ribbon you should click on the “Review” tab. Then from the changes group, you should click on the “Protect Sheet.” After this, you should assign the password for unlocking your Excel sheet in the future. You again have to enter the password for confirmation and click on OK option. Then you have to select the permissions from the listed option of “allow all users of this worksheet to” and then tap on OK. In case, you want to remove the protection, then you should go to the “Review” tab and then click on the button “Unprotect Sheet”. After this, you should enter the password and then click the “OK” button. Here, your sheet is unprotected and you can apply the protection again when you need it. this blog
You should go to the File menu in your opened Excel file. Now, click on the Info and select Protect Workbook and then choose protect workbook structure. After this, assign the password and then just click the “OK”. Now again enter the password for confirmation and hit “OK.” When you apply this option, then anyone can open your Excel document but they cannot be able to access its structural commands. If in case, other user knows your password, then they can access these commands. They just have to click on the “Review” tab and then hit on the “Protect Workbook”. Here, they just have to enter the password and then the structural commands get available. This will remove your Excel workbook structure protection. If you want to protect then again start the procedure. The above method will help you to protect your Excel Workbook from Editing. If you want more details about Excel app, then just visit to the site of MS Office via office.com/setup.
more information: - How to Troubleshoot If Wi-Fi Not Showing Up on Window 10? Microsoft typically releases a new Windows 10 Insider Preview. The first two days of the week are reserved for testing. However, as feature updates approach, fast ring builds will appear more often. Today, the company has released Windows 10 Insider Preview build 18351 to the Fast Ring. www.office.com/setup As expected at this point, there are no new front-facing features. Microsoft is focusing on fixing Windows 10, version 1903, which will be completed later this month and will be released in April. click here to download 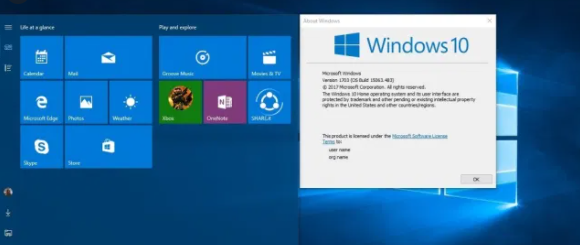 The following have been fixed and improved.
If you can't get the game State of Decay for free (for a limited time), you have more slots available! Whether you've tried it in a previous build or haven't had a chance yet, these steps have everything you need. We've also made some fixes to improve the download and installation experience thanks to your feedback, so if you've encountered any issues before, please try again. Fixed a recent build issue that could cause the monitor to be missing from the built-in color management application. Fixed an issue that caused Explorer.exe to crash on some Insiders when the Jump List content was updated. Fixed an issue that caused the unexpected result of waiting 30 seconds for a pin to be re-entered on some devices after it was incorrectly entered on the lock screen. this link Fixed an issue where the time displayed on the Windows Sandbox clock might not match the clock outside the Windows Sandbox. Fixed an issue where emoji 12 emojis would appear as boxes in certain XAML text fields. Fixed an issue where text scaling values were not retained after upgrading a Win32 application. This feature has been disabled since build 18351 due to reader reliability issues with the "Change the reading of uppercase text" feature. Fixed an issue where the mouse pointer accidentally turned white after signing out and then signing back in. office.com/setup There are still some known issues. Here's what's still broken: Launching a game that uses anti-cheat software may trigger a bug check (GSOD). The Creative X-Fi sound card is not working properly. We are partnering with Creative to solve this problem. This flight includes night lighting improvements, but we are continuing to investigate issues reported in this area. Some Realtek SD card readers are not working properly. We are investigating this issue. We are investigating reports that Chinese versions of multiple games are not working. We are investigating an issue where regional settings are reset when upgrading some Insiders. We are investigating an issue where VMware is unable to install or update Windows Insider Preview builds. Hyper-V is a viable alternative, if available. If you install any of the recent builds from the fast ring and switch to the slow ring, optional content such as enabling developer mode will fail. You need to stay in the fast ring to add / install / enable optional content. This is because the optional content is only installed in approved builds for a particular ring. Office.com/setup When Windows 10, version 1903 ships next month, Insiders of the First Ring will see builds from the 19H2 development branch. Currently, Skip Ahead is already testing the 20H1. It will be released in the first half of 2020. this blog As usual, you can go to Settings-> Update & Security-> Windows Update-> Check for Updates to install today's build. If you want to register when you're not in the Fast Ring, go to the Windows Insider Program tab. For information on installing the Microsoft Office Guide, please visit www.office.com/setup. Microsoft Excel Freeze Panes feature is the very useful feature and is basically used to lock row or column headings. It is because when you scroll down and see the rest of the sheet, its first row and column gets stick on the screen. As a result, heading will always displays on your screen when you scroll your worksheet. To enjoy the features of Microsoft Excel, you should install Microsoft Office in your device through www.office.com/setup. 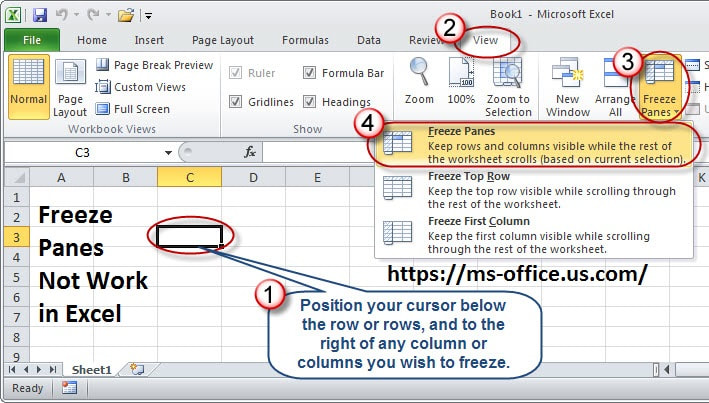 Causes of Excel Freeze Panes Not Working: The causes of this problem are when your MS Excel worksheet is in the page layout view, when Windows protection is turned on and also when the Excel sheet is protected by the earlier versions of Excel. Because of all this issues, Excel Freeze Panes Not Work properly. Solution To Fix MS Excel Freeze Pane Not Working Problem:
If you want to enable the Freeze Panes option, then you should unprotect your Excel workbook. For this, you should click on the Review tab from the Excel ribbon. If there is colored background in the workbook then it is the clear indication that the protection is active. Here, you should click on to the unprotect workbook. Now, in the opened window you should type the password and hit on OK button.
In case, your Excel workbook is in page layout view then you should quickly change it to Page Break Preview or normal view. For this, you should click on the View tab from the Excel menu. After this, from the Workbook Views group you should select any option like normal, page break preview, or custom views. www.office.com/setup
For this, you should click to the View tab and then from the Window group, you should select the Freeze Panes arrow sign. Now from the drop-down menu, you should select the “Unfreeze Panes”. This method helps in fixing the issue.
You can also format your data like a table instead of freezing top row. For this, you should go to the Home tab and then from the style group you should select the Format as Table. Now when you scroll down in your Excel sheet, your column number will have the position of header title.
If above method does not work then you should use the MS Excel Repair Tool to fix the corruption issue in your Excel workbook. The above method will help you to fix Excel Freeze Panes Not Working Issue. But if the customer needs any kind of technical assistance then they can contact to the customer care executive of Microsoft Office through office.com/setup. webroot.com/safe avg.com/retail |
